Installing Ubuntu Linux Gutsy Gibbon - Server Version 7.10
Installing Ubuntu Linux Gutsy Gibbon - Server Version 7.10
Installing Ubuntu Linux Gutsy Gibbon - Server Version 7.10

Create successful ePaper yourself
Turn your PDF publications into a flip-book with our unique Google optimized e-Paper software.
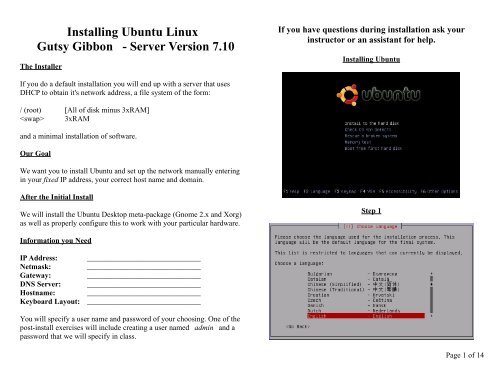
<strong>Installing</strong> <strong>Ubuntu</strong> <strong>Linux</strong><br />
<strong>Gutsy</strong> <strong>Gibbon</strong> - <strong>Server</strong> <strong>Version</strong> <strong>7.10</strong><br />
The Installer<br />
If you do a default installation you will end up with a server that uses<br />
DHCP to obtain it's network address, a file system of the form:<br />
/ (root) [All of disk minus 3xRAM]<br />
3xRAM<br />
and a minimal installation of software.<br />
Our Goal<br />
We want you to install <strong>Ubuntu</strong> and set up the network manually entering<br />
in your fixed IP address, your correct host name and domain.<br />
After the Initial Install<br />
We will install the <strong>Ubuntu</strong> Desktop meta-package (Gnome 2.x and Xorg)<br />
as well as properly configure this to work with your particular hardware.<br />
Information you Need<br />
IP Address: ______________________________<br />
Netmask: ______________________________<br />
Gateway: ______________________________<br />
DNS <strong>Server</strong>: ______________________________<br />
Hostname: ______________________________<br />
Keyboard Layout: ______________________________<br />
You will specify a user name and password of your choosing. One of the<br />
post-install exercises will include creating a user named admin and a<br />
password that we will specify in class.<br />
If you have questions during installation ask your<br />
instructor or an assistant for help.<br />
<strong>Installing</strong> <strong>Ubuntu</strong><br />
Step 1<br />
Page 1 of 14
Step 2<br />
Step 3<br />
Step 4<br />
Step 5<br />
This may be different depending on location.<br />
Page 2 of 14
Step 6<br />
Again, this may be different depending on location.<br />
Step 7<br />
You will see several screens appear as the installer loads various modules<br />
and detects hardware. Eventually you will see the screen below. If you<br />
can press Cancel in time please do so, otherwise see the screen in Step<br />
8 and choose to Go Back to manually configure your network.<br />
Step 8<br />
Only if you did not press Cancel in step 7.<br />
Step 9<br />
Note<br />
On the next page for steps 10-14 you should use the values you filled in<br />
Page 3 of 14
for your network information at the start of this exercise.<br />
Step 10<br />
Step 11<br />
Step 12<br />
Step 13<br />
Step 14<br />
Remember to use lowercase characters in your hostname.<br />
Partitioning<br />
On the next page you will do a Guided partition of your drive.<br />
Page 4 of 14
Step 15<br />
Step 16<br />
The drive and size will be different for your machine.<br />
After this you should see some screens appear as the installer prepares to<br />
partition your drive. If you are asked to delete what is already on your<br />
machine you should do this.<br />
Step 17<br />
Be sure you choose Yes below.<br />
Again, you will see some screens appear as the installer completes<br />
partitioning your drive. Then you should see:<br />
Step 18<br />
In reality you would probably want your server's clock to be set to<br />
Universal Time (UTC), but for purposes of our lab it is simplest if we<br />
choose No at this point.<br />
Page 5 of 14
Step 19<br />
(Enter in a user name you wish to use in place of Jane User )<br />
Step 20<br />
(If you wish a different username you can specify this here.)<br />
Step 21<br />
Step 22<br />
Step 23<br />
Now you should see this on your screen for a fairly long time...<br />
Page 6 of 14
And then this...<br />
You should not see this screen.<br />
Step 24<br />
Step 24a<br />
If you see this, then your network settings are likely broken. At this point<br />
installation will take a very long time. Let your instructor or assistant<br />
know that you are seeing this screen as restarting the installation is<br />
probably faster than waiting for completion.<br />
Step 25<br />
For now please don't choose to install any packages.<br />
Step 26<br />
You should see this. At 85% things will take a bit to finish..<br />
.<br />
Step 27<br />
Page 7 of 14
Step 28<br />
Congratulations! You have installed <strong>Ubuntu</strong>.<br />
The Final Step<br />
Your machine reboots and starts <strong>Ubuntu</strong> server. You will be presented<br />
with an initial log in prompt. If your screen stops at Running local boot<br />
scripts (/etc/rc.local) just press ENTER to get the initial log in prompt.<br />
Next we'll be doing some exercises to practice some concepts in <strong>Ubuntu</strong><br />
as well as setting up your <strong>Ubuntu</strong> environment to run with a graphical<br />
user interface (GUI) using the Xorg XWindow system with the Gnome<br />
desktop.<br />
Manual Partitioning of Drives<br />
During this installation we did a Guided Partition of your entire drive.<br />
Manually partitioning your drive using the <strong>Ubuntu</strong> installer involves<br />
numerous steps. You may wish to do this if you install <strong>Ubuntu</strong> back at<br />
your own location this workshop includes an appendix to this installation<br />
guide that gives you step-by-step instructions for doing a sample manual<br />
partition of a drive during installation of <strong>Ubuntu</strong>.<br />
The appendix on the following pages has step-by-step instructions for<br />
doing this.<br />
If you are looking at a printout without an appendix, the appendix is<br />
available in the on-line version of this document on your workshop's web<br />
site. The document is linked in the Detailed Agenda for this workshop.<br />
Page 8 of 14
Appendix<br />
Manual Partitioning of Drives<br />
In Step 15 of the installation we chose Guided use entire disk . If you<br />
wish to manually partition a drive for installation of <strong>Ubuntu</strong> you should<br />
follow these steps instead.<br />
Step 1<br />
Step 2<br />
Your machine may already have partitions on it. If this is the case you<br />
need to delete each individual partition first, then you can create<br />
partitions. Here is a sample of deleting one partition. Repeat this until all<br />
partitions are deleted:<br />
Step 3<br />
Page 9 of 14
Step 4<br />
Now repeat 1 through 3 until you have no partitions left. Then go on to<br />
step 5.<br />
Step 5<br />
These screens show a sample drive. Your drive will be different.<br />
Step 6<br />
Step 7<br />
Step 8<br />
Your partition size will be different.<br />
Page 10 of 14
Step 9<br />
Step 10<br />
Again, your disk size is different than what's in the dialog on this screen.<br />
If, for example, you had 1GB of RAM you might want 1 or 2GB for<br />
swap. If you are using 40GB of disk space, then to have 1GB of swap<br />
space you would do the following:<br />
Step 11<br />
Step 12<br />
Page 11 of 14
Step 13<br />
Step 14<br />
Step 15<br />
Step 16<br />
If this dialog is incorrect simply enter in the maximum size listed at the<br />
top of the dialog for your machine. This will be the SWAP space (virtual<br />
memory) in use on your machine.<br />
Step 17<br />
Page 12 of 14
Step 18<br />
Step 19<br />
Note the difference. You chose Use as: in step 18. This gives you the<br />
dialog below. This is how you set this partition to be swap.<br />
Step 20<br />
Step 21<br />
Page 13 of 14
Step 22<br />
Step 23<br />
You'll see this on the screen...<br />
Once this dialog finishes you are done partitioning your drive. Note that<br />
the partition we created was the same as you get if you choose Guided<br />
us entire disk in Step 1. Naturally you could choose to partition your<br />
drive any way you wish.<br />
Page 14 of 14