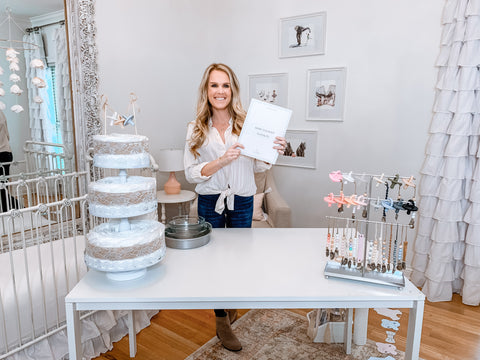
Creating a diaper cake is an easy way to add a super cute and personal touch to a baby shower. Diaper cakes are an easy DIY project and will only require a few supplies, most of which can be found around your home. An added bonus, the guest of honor at the baby shower will leave with extra diapers for their little one on the way!
We love this project because personal touches can be applied to the diaper cake by using Cutie products for any theme or gender! If the gender of the baby is a secret, use core color neutrals or a Cutie PAT Kit to add personality to your cake.
We created a video tutorial to show you step-by-step of how to make a diaper cake (DIY style). Also included is a downloadable printable with baby themed cutouts which can be used on the diaper cake or as decor for the baby shower.
Diaper Cake Supplies:
- Large box of size 1 diapers (white or a faint print - we used Up and Up brand)
- 3 different sized cake pans/bowls OR 3 tier cake stand
- Rubber bands or string
- Tape or 3 safety pins
- Paper towel roll
- Wide and narrow ribbon
- Cake topper
- Cutie products (Cutie PATs, Cutie Clips and/or Cutie Tensils, etc.)
How to Make Your Diaper Cake:
Step 1) Stack diapers (place back of diaper facing forward to avoid seeing patterns) and line the inside of the cake pan until the circle is complete.
Step 2) Place paper towel roll in the center of the cake pan and line diapers around until the cake pan is full. The paper towel roll should now be secure and sturdy amongst the diapers.
Step 3) Using a rubber band or string, tie around the outside lining of the layer created. Remove diapers from the pan and remove paper towel roll. This will serve as your base layer of the cake.
Step 4) Repeat this process with a slightly smaller pan or bowl. Upon completion of the second layer, remove diapers from the pan and place it directly on top of the first and largest layer, then remove the paper towel roll.
Step 5) In the smallest bowl or pan, repeat the steps listed above. Once this layer is complete, remove the paper towel roll and put it into layers one and two for stabilization of the cake. Place the third layer on top and roll two diapers to put into the hole that remains in the top of the diaper cake.
Step 6) Next, add ribbon that has been cut to size, around each layer and secure with safety pins or tape. This process will cover up the rubber band or string that was used to tie together each layer of diapers.
Step 7) The details! We have added a topper created with two skewers, ribbon glued in between and Cutie PATs threaded onto the ribbon. This creates an adorable banner that will be a very practical gift as well! Additional Cutie products can be added on each tier of the CUTIE CAKE!
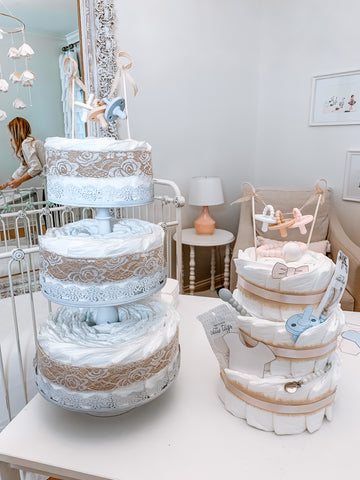
Make this fun DIY very simple or loaded with Cutie gifts for mom and baby, either way, it will be a talked about centerpiece that will complete your table. Be sure to tag us on Instagram @ryanandrose and show us your cakes. Also, share your projects in the Cutie Community on Facebook.
If you're in need of decorations, download our printables and use these adorable images as cupcake toppers, thank you tags for party favors, on your diaper cake, or scatter them on your table to add a pop of color:
- Free Baby Shower Cutouts DOWNLOAD [http://ryanandrose.co/?YTcutouts]