

Introduction: MY DIY 2D Quadratic Residue Diffuser


Explanation: This photo is a typical DIY 2D Quadratic Residue diffusor. The grid patterns of diffusors may seem strange and complex, but the logic used to build them is actually easy to apply.
While hardly a glamorous concept, room acoustics represent a critical link in the recording or playback chain. While comprehensive room design is a complex cocktail of science, math and chance — certain obvious issues can be easily dealt with to improve your recordings — even in a home or project studio environment. One such problem is specular reflections, mirror-like reflections of sound that cause flutter echoes. Flutter echoes are hollow, metalic "bathroom" effects that honk at particular frequencies or discrete repeats. While absorption will control some of these issues by removing acoustic energy, you might be interested in some diffusion instead — particularly if your space is already on the "dead" side. Diffusors come in many types, all designed with the objective of scattering reflected sound (relatively) equally in all directions.
One popular style is the 2D Quadratic Residue diffusor. This design is based upon a complex set of calculations involving prime numbers whose results are then quantized into "steps" for ease of manufacture. Mathematical proofs and theoretical explanations can be found in text books and research papers, but understanding them (or using a specialized calculator) is not necessary to build the panels. The practical results are outstanding. Unlike many diffusors, this design works equally well in both the horizontal and vertical dimensions and boasts effectiveness even with modest 20% coverage.
These panels are neither difficult nor expensive to build. All that's required is to cut several wood pieces to specified lengths and arrange them on a piece of 18 inch by 18 inch plywood or hardboard, according to the pre-calculated chart.
The Idea: I wanted to try a diffusor and being the DIYer I am, was willing to give it a shot. After much research, reading and internet searches I was overwhelmed with examples. Some were written by acoustic/math geniuses with tons of computations. Some were the guy with a YouTube channel hacking something together hit or miss. I chose to use a QRD calculator and by multiple attempts, found a sequence and number of cells I was satisfied with. I have a handy dandy shop in my garage full of lost projects and home maintenance/repair parts and pieces. I used a piece of thin plywood cut to the proper size to fit my grid (18’x15”).
I recycle all my plastics and soda bottles are readily available. I’ve tried to find a way to condense the plastic for storing while awaiting the trip to the recycle center. Short of building a plastic shredder, a large plastic bag holds the stuff. When considering building this diffuser (while drinking a soda) I realized the bottom of the bottle is very weirdly diffuse in its own way. This would surly diffuse sound. Eureka! It didn’t really take long to acclimate 30 bottles with the family pitching in. (We really should cut down on the soda but water bottles are way too thin anyway). My plan was to cut the tops off the bottles to the proper lengths and squirt just enough spray foam inside to firm up the bottles without distorting them and that would fill the cavities of the panel. Now it’s just a matter of using glue to attach the bottles to the base following the calculated grid. Easy-peasy!
Supplies
The only materials required are:
· Several 12oz plastic soda bottles (the exact number depends on your chosen diffusor size).
- Spray foam sealant for the inside of the bottles after cutting. One can filled all 27 of my bottles. Don’t overfill. That stuff almost doubles as it grows!
- A piece of thin 1/4 inch plywood (Masonite or hardboard is fine). I actually framed mine for rigidity but it may not be necessary if your board is stiff enough.
- A tube of construction adhesive and a caulk gun.
- A razor blade box opener, knife or scissors for cutting the bottles.
- I found the cured foam in the bottles was easily enough trimmed with a knife. I used a hacksaw with good success and the bottoms can be leveled off easily by scrubbing on a rough surface.
- Some means of hanging (You can use aluminum wire and picture hangers for modularity, but wall board screws would work well for more permanent installation).
- Paint. These look hideous without some paint.
Step 1: Determine Pattern

Each of these squares is a piece of 12 oz. plastic soda bottle sticking out from the plywood base. The number represents the length of the piece. Google QRD calculator and enter your room size and play with the numbers until you get a pattern you can live with.
Step 2: Determine Depth

The project is somewhat flexible, in that the diffusor can be made to any reasonable depth — the longer the pieces, the lower the frequency at which the diffusor is effective. I was restricted to the maximum length by the bottles used. It was reverse thinking but the length and size of the bottles determined the bandwidth of my panel on the calculator. I made shallow panels — my six lengths (in inches) were 6, 5, 4, 3, 2 and 1 plus 0 for the empty spaces, for effectiveness above about 2251 kHz. The maximum available lengths (6 in.) extends diffusion downward to 1000 Hz. Using simple math to maintain proportions, these lengths can be adjusted by any practical amount. Because I find absorption at low frequencies and diffusion at higher frequencies to be a good combination, the higher effective band was determined to be adequate for my needs. Bass and broadband absorption will be used for lower frequencies. With plastic bottles I wasn’t too concerned about weight. I expect the weight to be much less than wood.
Step 3: Cut the Bottles

Use the chart to determine how many pieces of each length to cut. Note that the RATIOS of the length are more important than the absolute measurements.
For 6 inch deep diffusors, each panel will require a bottle for each position cut to length. I used a razor knife and carefully cut each bottle as evenly as possible. For efficiency, I cut the proper quantity for each length at the same time and sorted them accordingly. I used a marked bottle as my guide. Start with the longest so you can use the miscuts trimmed a little shorter.
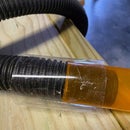
Step 4: Fill Bottles


Place your bottles on a plastic sheet to protect the workspace. Gloves come in handy. The foam is sticky and messy. Practice on a few of the longer pieces to get the hang of spraying the foam. Don’t try to fill the bottles completely. Over filling can deform the shapes and really isn’t necessary. Any overfoam ( and there will be some…) can be trimmed with the razor knife when completely dry. Trim your 1/4-inch plywood or hardboard slightly larger than 18 inch square. I recommend an extra half-inch or so in each direction to account for variances due to warpage, etc.
Step 5: Glue Panels Together

Assemble according to the pattern chart, making sure to leave spaces marked with a "0" empty. Apply high-quality glue to the bottom of each piece before attaching to the backing board. I used a construction adhesive and a caulking gun. It was tacky but pliable enough for some adjusting. If desired, you may also apply glue to the side junctions of pieces for extra durability. Neatness counts.
Step 6: Paint


I chose to spray paint my panel after assembly for ease. You could consider painting each length its own color before assembling. An attractive four or five color scheme results in a panel that's as decorative as it is functional. Use paint that is made for plastics or it will just flake off. I used Rust-oleum Primer for plastic. I still haven’t decided on a final color but was leaning toward a deep blur or metallic that would make it look far from soda bottles.
Step 7: Hang and Enjoy
Use appropriate mounting hardware to hang your panels. Because my 6-inch deep bottle panels weigh less than a few pounds each, I screwed the panels directly to the wall in my studio. You can elect to hang them with picture wire, like art. You can apply stick-on felt furniture feet to the rear four corners to keep the hanging panels from marring the wall surface and allows the option of temporary placement on the floor to diffuse floor-to-ceiling reflections.
You should be able to build these diffusors for a couple of dollars per panel even buying the glue, paint and some wood. With careful assembly, they look great and offer superior management of specular reflections.

Participated in the
Repair and Reuse Contest


